HTTP
Contents
- Hypertext Transfer Protocol. Based on RFC 822/MIME format.
- For transferring binary it uses base64 since HTTP is a protocol used to transfer text. To transfer binary it must be encoded as text and sent out. This is what base64 is used for. It encodes 4 characters per 3 bytes of data plus padding at the end. Thus, each 6 bits of input is encoded in a 64-character alphabet (efficiency is 4/3 = 1.333 times original).
- HTTP 1.1 added persistent connections, byte ranges, content negotiations, and cache support.
- Note that HTTP’s protocol overhead along with connection setup overhead of using TCP can make HTTP a poor choice for certain applications. In these cases, UDP is recommended (for example DNS uses simple UDP requests/responses for most of the DNS queries). Can mitigate some of the overhead by using persistent HTTP connections.
Basic format for requests/responses:
message = <start-line>
          (<message-header>)*
          CRLF
          [<message-body>]

<start-line> = Request-Line | Status-Line
<message-header> = Field-Name ':' Field-Value
Request format:
Request-Line = Method SP(Space) URI SP(Space) HTTP-Version CRLF
Method = "OPTIONS"
       | "HEAD"
       | "GET"
       | "POST"
       | "PUT"
       | "DELETE"
       | "TRACE"
GET /articles/http-basics HTTP/1.1
Host: www.articles.com
Connection: keep-alive
Cache-Control: no-cache
Pragma: no-cache
Accept: text/html,application/xhtml+xml,application/xml;q=0.9,*/*;q=0.8
Response format:
Status-Line = HTTP-Version SP(Space) Status-Code SP(Space) Reason-Phrase CRLF
HTTP/1.1 200 OK
Server: nginx/1.6.1
Date: Tue, 02 Sep 2014 04:38:20 GMT
Content-Type: text/html
Last-Modified: Tue, 05 Aug 2014 11:18:35 GMT
Transfer-Encoding: chunked
Connection: keep-alive
Content-Encoding: gzip
Query String
Notes from: Wikipedia - Query string and’ RFC 3986 - Uniform Resource Identifier (URI).
- Part of the URL that does not really fit in a path hierarchy.
Example:
http://example.com/over/there?name=ferret - Server may pass the query string to a CGI (Common Gateway Interface) script.
- The
?separates the resource from the query string. Example for Google search:https://www.google.com/?gws_rd=ssl#q=test. Thus, the URL can be bookmarked and shared. - Usually used to store content of web forms.
- The format is key,value pairs. Series of pairs usually separated by
&. - The
#is known as a fragment.
  foo://example.com:8042/over/there?name=ferret#nose
  \_/   \______________/\_________/ \_________/ \__/
   |           |            |            |        |
scheme     authority       path        query   fragment
   |   _____________________|__
  / \ /                        \
  urn:example:animal:ferret:nose
Chunked Transfer Encoding
- New feature of HTTP/1.1.
- According to RFC 2616: The chunked encoding modifies the body of a message in order to transfer it as a series of chunks, each with its own size indicator.
- Used to transfer dynamically produced content more efficiently.
- Uses Transfer-Encoding header instead of Content-Length header. Since there is no content length header, server can start sending response as it gets content.
- Size of each chunk is sent right before chunk so receiver knows when it has completed receiving chunks.
- Data transfer is terminated by chunk of length 0.
- Advantages, for example, is when response starts sending HTML page to browser (start with <head>, which includes external scripts location), so browser can start downloading this scripts in parallel.
- Sometimes you want to upload data but don’t know the length of data yet. A good use of this feature would be performing a database dump, piping the output to gzip, and then piping the gzip file directly to Cloud Files without writing the data to disk to compute the file size.
- Example is below. Note that the first chunk has size 0x45ea which is 17898 bytes. Then last chunk is 0 length.
C: GET / HTTP/1.1
Host: www.google.com
Accept: */*
Accept-Encoding: gzip, deflate
User-Agent: HTTPie/0.8.0

S: HTTP/1.1 200 OK
Date: Thu, 16 Oct 2014 04:16:25 GMT
Expires: -1
Cache-Control: private, max-age=0
Content-Type: text/html; charset=ISO-8859-1
Set-Cookie:
PREF=ID=26f17b4e26a810fd:FF=0:TM=1413432985:LM=1413432985:S=ZtumMxEG9KJAGJDr;
expires=Sat, 15-Oct-2016 04:16:25 GMT; path=/; domain=.google.com
Set-Cookie: NID=67=PW5SAvG5XSS2ptSNeN6WfK11dy7qJxM3MM7sRvn_M3CPp6zdr_QihMyA66yTEt47n1PZyGHvIVv_9ecJW2-1LCwliBR1jzxj6F5fXDltgRWwbaTB9a7AFNHHw-qQ_V_g;
expires=Fri, 17-Apr-2015 04:16:25 GMT; path=/; domain=.google.com; HttpOnly
P3P: CP="This is not a P3P policy! See
http://www.google.com/support/accounts/bin/answer.py?hl=en&answer=151657
for more info."
Server: gws
X-XSS-Protection: 1; mode=block
X-Frame-Options: SAMEORIGIN
Alternate-Protocol: 80:quic,p=0.01
Transfer-Encoding: chunked

45ea
<!doctype html><html itemscope="" itemtype="http://schema.org/WebPage" ...

...
</script></div></body></html>
0
Codes
Summary:
Code Classification 1xx Informational 100 Continue 2xx Success 200 OK 3xx Redirection 301 Moved Permanently 302 Found 4xx Client Error 401 Unauthorized 403 Forbidden 404 Not Found 5xx Server Error 500 Internal Server Error
Examples
Code 301 Redirection
An example of this is when requesting a certain snapshot from the debian archives. Let’s request for a date (January 02, 2012 22:05:11) 20120102T220511Z:
$ http --headers get http://snapshot.debian.org/archive/debian/20120102T220511Z/pool/main/b/bash/
HTTP/1.1 301 Moved Permanently
Accept-Ranges: bytes
Age: 0
Cache-Control: public, max-age=600
Connection: keep-alive
Content-Encoding: gzip
Content-Length: 224
Content-Type: text/html; charset=UTF-8
Date: Wed, 01 Oct 2014 18:36:27 GMT
Expires: Wed, 01 Oct 2014 18:46:26 GMT
Location: http://snapshot.debian.org/archive/debian/20120102T214803Z/pool/main/b/bash/
Server: Apache
Vary: Accept-Encoding
Via: 1.1 varnish
X-Varnish: 1485917301
Notice that we get back a 301 code that stands for redirection. We then get redirected to http://snapshot.debian.org/archive/debian/20120102T214803Z/pool/main/b/bash/.
Code 302 Found
Indicates resource resides temporarily under a different URI (10.3.3 302 Found).
$ http get amits-notes.readthedocs.org
  HTTP/1.1 302 FOUND
  Connection: keep-alive
  Content-Language: en
  Content-Length: 0
  Content-Type: text/html; charset=utf-8
  Date: Tue, 14 Oct 2014 18:37:30 GMT
  Location: http://amits-notes.readthedocs.org/en/latest/
  Server: nginx/1.4.6 (Ubuntu)
  Vary: Accept-Language, Cookie
  X-Deity: chimera-lts
  X-Fallback: True
Methods
GET
Fetch a resource. Example in python:
def get():
# Simple GET of index.html
headers = { 'User-Agent': 'http_client/0.1',
            'Accept': '*/*',
            'Accept-Encoding': 'gzip, deflate' }
http_conn = http.client.HTTPConnection("localhost")
http_conn.set_debuglevel(1)
http_conn.request("GET", "/", headers=headers)

## Response
resp = http_conn.getresponse()
print()
print("Status:", resp.status, resp.reason)

## Cleanup
http_conn.close()
Difference Between POST and PUT
POST is used for creating, PUT is used for updating (and creating). It’s also worthwhile to note that PUT should be idempotent whereas POST is not.
- Idempotent means that same request over and over has same result. Thus, if you are doing PUT and connection dies, you can safely do a PUT again.
Also, according to HTTP/1.1 spec:
The POST method is used to request that the origin server accept the entity enclosed in the request as a new subordinate of the resource identified by the Request-URI in the Request-Line
The PUT method requests that the enclosed entity be stored under the supplied Request-URI. If the Request-URI refers to an already existing resource, the enclosed entity SHOULD be considered as a modified version of the one residing on the origin server. If the Request-URI does not point to an existing resource, and that URI is capable of being defined as a new resource by the requesting user agent, the origin server can create the resource with that URI.”
Thus, POST can be used to create. PUT can be used to create or udpate.
Difference is in terms of API calls. You usually do a POST to an API endpoint (or a URL that already exists).
POST https://www.googleapis.com/dns/v1beta1/projects/project/managedZones

{
    parameters*
}
- With PUT you actually create a valid path under the URL:
PUT /questions/<new_question> HTTP/1.1
Host: wahteverblahblah.com
- Thus, you use PUT to create the resource and then use that URL for POST.
- Note that with POST, server decides new URL path, with PUT user decides.
Persistent Connections
- Uses Connection: keep-alive header request/response header.
- Idea is to use single TCP connection to send and receive multiple HTTP Requests/Responses. Thus, avoiding expensive TCP handshake.
- This is default in HTTP/1.1.
- Disadvantages when single documents are repeatedly requested (e.g. images). This kills performance due to keeping unnecessary connections open for many seconds after document was retrieved.
- When you set up a TCP connection, you associate a set of timers. Some of the timers are used for keepalive.
- A Keepalive probe is a packet with no data and ACK flag turned on.
- Note that in TCP/IP RFC, ACK segments with no data are not reliably transmitted by TCP. Thus, no retries.
- Remote host doesn’t need to support keepalive. It will see an ACK packet and send back an ACK reply.
- Since TCP/IP is a stream oriented protocol, a zero length data packet is not dangerous for user program.
- If no reply packets are received for keepalive probe, can assume that connection is broken.
- Also useful when NAT terminates connection since it only can keep track of certain number of connections at a time.
- Useful to know if peers have died before notifying you (e.g. kernel panic, reboot).
 _____                                                     _____
|     |                                                   |     |
|  A  |                                                   |  B  |
|_____|                                                   |_____|
   ^                                                         ^
   |--->--->--->-------------- SYN -------------->--->--->---|
   |---<---<---<------------ SYN/ACK ------------<---<---<---|
   |--->--->--->-------------- ACK -------------->--->--->---|
   |                                                         |
   |                                       system crash ---> X
   |
   |                                     system restart ---> ^
   |                                                         |
   |--->--->--->-------------- PSH -------------->--->--->---|
   |---<---<---<-------------- RST --------------<---<---<---|
   |                                                         |
References:
- TCP Keepalive HOWTO
- Wikipedia - HTTP Persistent Connection
- RFC 1122 Section 4.2.3.6 - TCP Keep-Alives
keepalive in Linux
Default is two hours before starting to send keepalive packets:
# cat /proc/sys/net/ipv4/tcp_keepalive_time
7200

# cat /proc/sys/net/ipv4/tcp_keepalive_intvl
75

# cat /proc/sys/net/ipv4/tcp_keepalive_probes
9
To add support to your application use setsockopt() and configure the socket connection for keepalive.
Can also use libkeepalive with LD_PRELOAD to add support to any C application.
Document Caching
From: Google Browser Security Handbook, Part 2
HTTP requests are expensive mainly because of overhead of setting up TCP connections. Thus, important to have the browser or intermediate system (proxy) maintain local copy of some of the data.
The HTTP/1.0 spec did define some headers to handle caching but it did not provide any specific guidance.
Expires: This is a response header that allows server to declare an expiration date. When this date is passed, browsers must retrieve new document. There is a Date header as well which defines the date and time which message was originated. Sometimes, however, Date header is not part of response. Thus, implementation is then browser specific.
The RFC also does not specify if the Expires is based on browser’s local clock. Thus, current practice is to compute Expires-Date delta and compare it to browser clock.
Pragma request header when set to no-cache permits clients to override intermediate systems to re-issue requests rather than retrieve cached data. For Pragma response header, it instructs browser not to cache this data.
Last-Modified response header indicates when resource was last updated according to server’s local clock. Reflects modification date of file system. Used in conjunction with If-Modified-Since request header to revalidate cache entries.
If-Modified-Since request header, permitting client to indicate what Last-Modified header it had seen on the version of the document already present in browser or proxy cache. If server calculates that no modification since If-Modified-Since date it returns 304 Not Modified response instead of requested document. Thus, client will redisplay cached content.
All of above was useful when content was static. Thus, with complex dynamic web apps, most developers turned off caching.
HTTP/1.1 acknowledges the issue and establishes ground rules for what and when should be cached.
- Only 200 (OK), 203 (Non-Authoritative), 206 (Partial Content), 300 (Multple Choices), and 301 (Redirection) responses are cacheable, and only if the method is not POST, PUT, DELETE, or TRACE.
- Cache-Control header introduced that provides a fine-grained
control over caching strategies.
- no-cache disables cache all together. Can disable cache for
certain specific headers as well (e.g. no-cache: Set-Cookie).
- Firefox still stores responses because of back and forward navigation between sessions. But it doesn’t do this on https connections because of sensitive information such as banking, etc.
- no-store: If in request don’t store any request response in cache. If sent in response, client must not store anything from request/response headers.
- public/private: Controls caching on intermediate systems.
- max-age: Time to live in seconds.
- no-cache disables cache all together. Can disable cache for
certain specific headers as well (e.g. no-cache: Set-Cookie).
Authentication
Basic Auth
This is the simplest form of authentication since it doesn’t require cookies, session identifier or login pages. It uses standard HTTP Authorization header to send login credentials. Thus, no handshakes need to be done.
Typically used over https since encoding is done in base64 (passwords sent as plain text). Passwords can be easily decoded.
On Server, status code 401 is sent back and the following header is used:
WWW-Authenticate: Basic realm="Restricted"
On Client, the Authorization header is used with the following format:
Authorization: Basic base64("username:password")
Example in python:
def get_auth():
# GET with authorization of index.html
authstring = base64.b64encode(("%s:%s" % ("amit","amit")).encode())
authheader = "Basic %s" % (authstring.decode())
print("Authorization: %s" % authheader)

headers = { 'User-Agent': 'http_client/0.1',
            'Accept': '*/*',
            'Authorization': authheader,
            'Accept-Encoding': 'gzip, deflate' }
http_conn = http.client.HTTPConnection("localhost")
http_conn.set_debuglevel(1)
http_conn.request("GET", "/", headers=headers)

## Response
resp = http_conn.getresponse()
print()
print("Status:", resp.status, resp.reason)

## Cleanup
http_conn.close()
Digest
Basically uses MD5 of password and nonce value to prevent replay attacks. Now, pretty much replaced by HMAC (keyed-hash message authentication code).
A basic digest authentication session goes as follows:
HTTP client performs a request (GET, POST, PUT, etc)
HTTP server responds with a 401 error not authorized. In the response, a WWW-Authenticate header is sent that contains:
- Digest algorithm - Usually MD5.
- realm - The access realm. A string identifying the realm of the server.
- qop - Stands for quality of protection (e.g. auth)
- nonce - Server generated hash, issued only once per 401 response. Server should also have a timeout for the nonce values.
Client then receives the 401 status error and parses the header so it knows how to authenticate itself. It responds with the usual header and adds an Authorization header containing:
- Digest username
- realm
- nonce - Sends the server generated value back.
- uri - Sends the path to the resource it is requesting.
- algorithm - The algorithm the client used to compute the hashes.
- qop
- nc - hexadecimal counter for number of requests.
- cnonce - client generated nonce, always is generated per request.
- response - Computed hash of
md5(HA1:nonce:nc:cnonce:qop:HA2).- HA1 =
md5(username:realm:password) - HA2 =
md5(<request method.:uri)
- HA1 =
Notice how the client does not send the password in plain text.
Server computes hash and compares to client’s hash and if it matches sends back OK with content. Note that rspauth sent back by server is a mutual authentication proving to client it knows its secret.
Note that each client needs to know the password and the password needs to be shared securely before hand.
Example HTTP Capture:
C:
GET /files/ HTTP/1.1
Host: localhost
User-Agent: http_client/0.1
Accept-Encoding: gzip, deflate
Accept: */*

S:
HTTP/1.1 401 Unauthorized
Server: nginx/1.6.1
Date: Sat, 06 Sep 2014 02:09:24 GMT
Content-Type: text/html
Content-Length: 194
Connection: keep-alive
WWW-Authenticate: Digest algorithm="MD5", qop="auth", realm="Access Restricted", nonce="2a27b9b6540a6cd4"

C:
GET /files/ HTTP/1.1
Host: localhost
User-Agent: http_client/0.1
Accept-Encoding: gzip, deflate
Accept: */*
Authorization: Digest username="amit", realm="Access Restricted", nonce="2a27b9b6540a6cd4", uri="/files/",
response="421974c0c2805413b0d4187b9b143ecb", algorithm="MD5", qop="auth", nc=00000001, cnonce="e08190d5"

S:
HTTP/1.1 200 OK
Server: nginx/1.6.1
Date: Sat, 06 Sep 2014 02:09:24 GMT
Content-Type: text/html
Transfer-Encoding: chunked
Connection: keep-alive
Authentication-Info: qop="auth", rspauth="33fea6914ddcc2a25b03aaef5d6b478b", cnonce="e08190d5", nc=00000001..
Content-Encoding: gzip
Example Python Code:
def get_auth_digest():
    resp = get()

    # Get dictionary of headers
    headers = resp.getheader('WWW-Authenticate')
    h_list = [h.strip(' ') for h in headers.split(',')]
    #h_tuple = re.findall("(?P<name>.*?)=(?P<value>.*?)(?:,\s)", headers)
    h_tuple = [tuple(h.split('=')) for h in h_list]
    f = lambda x: x.strip('"')
    h = {k:f(v) for k,v in h_tuple}
    print(h)

    # HA1 = md5(username:realm:password)
    ha1_str = "%s:%s:%s" % ("amit",h['realm'],"amit")
    ha1 = hashlib.md5(ha1_str.encode()).hexdigest()
    print("ha1:",ha1)

    # HA2 = md5(GET:uri) i.e. md5(GET:/files/)
    ha2_str = "%s:%s" % ('GET',path)
    ha2 = hashlib.md5(ha2_str.encode()).hexdigest()
    print("ha2:",ha2)

    # Generate cnonce
    cnonce = hashlib.sha1(str(random.random()).encode()).hexdigest()[:8]
    print("cnonce:",cnonce)

    # Generate response = md5(HA1:nonce:00000001:cnonce:qop:HA2)
    resp_str = "%s:%s:%s:%s:%s:%s" % (ha1,h['nonce'],"00000001",cnonce,h['qop'],ha2)
    resp_hash = hashlib.md5(resp_str.encode()).hexdigest()
    print("resp_hash:",resp_hash)

    # Do another get
    authheader = 'Digest username="%s", realm="%s", nonce="%s", ' \
                 'uri="%s", response="%s", algorithm="%s", qop="%s", nc=00000001, ' \
                 'cnonce="%s"' \
                 % ("amit", h['realm'], h['nonce'], path, resp_hash, h['Digest algorithm'], h['qop'], cnonce)
    print(authheader)
    headers = { 'User-Agent': 'http_client/0.1',
                'Accept': '*/*',
                'Accept-Encoding': 'gzip, deflate',
                'Authorization': authheader
              }
    get(headers)
Cookie Based
Cookies are designed to maintain state. Thus, cookie based authentication inherits this stateful principle. Cookie authentication are the most common method used by web servers to know if the user is still logged in or not. The browser keeps sending back the same cookie to the server in every request.
Browser uses Set-Cookie header to ask client to store the cookie. The client uses Cookie header to send back the cookie to the server so the server knows which client it is talking to.
Cookies are incompatible with REST style/architecture since REST is stateless. According to REST style, cookies maintain site-wide state while REST styles maintains application state. In REST, cookie functionality can be achieved using anonymous authentication and client-side state. REST also defines an alternative to cookies when implementing shopping carts. According to REST:
Likewise, the use of cookies to identify a user-specific “shopping basket” within a server-side database could be more efficiently implemented by defining the semantics of shopping items within the hypermedia data formats, allowing the user agent to select and store those items within their own client-side shopping basket, complete with a URI to be used for check-out when the client is ready to purchase.
Cookies have certain rules and attributes:
- Name/value pair can’t contain spaces or ; =. Usually only ASCII characters. The ; is used as a delimiter.
- The Secure attribute means this cookie is only used in encrypted communications.
- The HttpOnly attribute means this cookie can only be used by http/https requests and not by JavaScript, etc. This prevents cross site scripting.
Other notes:
- Not good practice to store username/password in cookies, even if it is hashed/salted, etc. Can be stolen and eventually cracked.
- Cookie based authentication basically involves using the cookie the server sent to the client back to the server for every request.
Certificate Based
Idea is to separate those who verify password (the server will have a copy or a hash of the password) and those who define the user identity. Thus, certificate authority (CA) issues a private certificate to a user, and guarantees that it can communicate using this key with the public key issued to the other business party.
Note that the downside becomes apparent when large number of clients or users need to authenticate to the server. Thus, CA needs to issue certificate for each user. These certificates needs to be verified and if one user is compromised the certificate of that user can be used to authenticate to the server unless the certificate is revoked.
For the reasons stated above, client authentication is rarely used with TLS. A common technique is to use TLS to authenticate the server to the client and to establish a private channel, and for the client to authenticate to the server using some other means - for example, a username and password using HTTP basic or digest authentication.
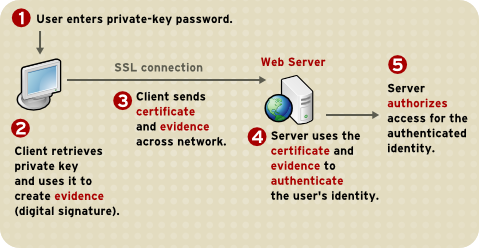
The above image depicts certificate-based authentication. The client asks the user to enter a password which unlocks the database holding the private key. The client then uses this private key to sign a random data and sends a certificate to the server. Thus, the password is never sent.
The Red Hat Portal discusses this in great detail.
HTTPS
- It’s HTTP over TLS or HTTP over SSL (https:// instead of http://). Thus, uses an added encryption layer (above Transport Layer, before Application Layer) of SSL/TLS to protect traffic.
- Main motivation is to prevent wiretapping/man in the middle attacks.
- HTTPS provides authentication of the website and associated web server that one is communicating with.
- Provides a bidirectional encryption of communications between a client and server.
- URL, query parameters, headers, are protected. However, it only protects HTTP layer. Thus, can infer host addresses, IP address, and sometimes port number of the webserver (since TCP layer is not encrypted). Can get data transferred and duration of TCP connection but not content.
Trusting a Web Site
- Web browsers know how to trust HTTPS websites based on certificate authorities that come pre-installed in their software.
- Certificate authorities, such as Comodo and GlobalSign, are in this way being trusted by web browser creators to provide valid certificates.
- Must use a browser that correctly implements HTTPS with correct pre-installed certificates.
- User trusts CA to “vouch” for website they issued certificate to.
- The user trusts that the protocol’s encryption layer (TLS/SSL) is sufficiently secure against eavesdroppers.
TLS/SSL
- Uses assymetric cryptography:
- Basically known as public key cryptography.
- Requires two keys. A private/secret and a public key.
- Public key is used to encrypt plain text or verify a digital signature. Private key is used to decrypt the plain text or create a digital signature.
- The assymetric key is used for authentication and encrypting the channel. Then, a symmetric session key is exchanged.
- The session key is used to encrypt data flowing between the parties. Important property is forward secrecy. This means that the short-term session key cannot be derived from long term assymetric secret key.
- In OSI model equivalences, TLS/SSL is initialized at layer 5 (session layer) and works at layer 6 (the presentation layer). The session layer has a handshake using an asymmetric cipher in order to establish cipher settings and a shared key for that session; then the presentation layer encrypts the rest of the communication using a symmetric cipher and that session key.
- TLS is the new name for SSL.
- SSL got to version 3.0 and TLS is “SSL 3.1”.
- Current version of TLS is 1.2.
- SSL (secure socket layer) often refers to the old protocol variant which starts with the handshake right away and therefore requires another port for the encrypted protocol such as 443 instead of 80.
- TLS (transport layer security) often refers to the new variant which allows to start with an unencrypted traditional protocol and then issuing a command (usually STARTTLS) to initialize the handshake.
- Differences between SSL and TLS in the protocol level:
- In the ClientHello message (first message sent by the client, to initiate the handshake), the version is {3,0} for SSLv3, {3,1} for TLSv1.0 and {3,2} for TLSv1.1.
- The ClientKeyExchange differs.
- The MAC/HMAC differs (TLS uses HMAC whereas SSL uses an earlier version of HMAC).
- The key derivation differs.
- The client can send application data can be sent straight after ending the SSL/TLS Finished message in SSLv3. In TLSv1, it must wait for the server’s Finished message.
- The list of cipher suites differ (and some of them have been renamed from SSL_* to TLS_*, keeping the same id number).
- There are also differences regarding the new re-negotiation extension.
- Use port 443 by default.
- TLS, which uses long-term public and secret keys to exchange a short term session key to encrypt the data flow between client and server.
- X.509 certificates are used to guarantee one is talking to the partner with whom one wants to talk.
- Need to ensure scripts are loaded over HTTPS as well and not HTTP.
- In case of compromised secret (private) key, certificate can be revoked.
- Use Perfect Forward Secrecy (PFS) so that short term session key can’t be derived from long term assymetric secret key.
Handshake
Client                                               Server

ClientHello                  -------->
                                                ServerHello
                                               Certificate*
                                         ServerKeyExchange*
                                        CertificateRequest*
                             <--------      ServerHelloDone
Certificate*
ClientKeyExchange
CertificateVerify*
[ChangeCipherSpec]
Finished                     -------->
                                         [ChangeCipherSpec]
                             <--------             Finished
Application Data             <------->     Application Data
- Exchange hello messages to agree on algorithms, exchange random
values, check for resume.
- The ClientHello and ServerHello establish the following attributes: Protocol Version, Session ID, Cipher Suite, and Compression Method. Additionally, two random values are generated and exchanged: ClientHello.random and ServerHello.random.
- Exchange necessary crypto parameters for client/server to agree on premaster secret.
- Exchange certs and crypto information to allow client/server to authenticate.
- Generate a master secret from the premaster secret and exchanged random values.
- Provide security parameters to the record layer.
- Allow the client and server to verify that their peer has calculated the same security parameters and that the handshake occurred without tampering by an attacker.
Server Setup
- To prepare a web server to accept HTTPS connections, the administrator must create a public key certificate for the web server.
- This certificate must be signed by a trusted certificate authority for the web browser to accept it without warning.
- Web browsers are generally distributed with a list of signing certificates of major certificate authorities so that they can verify certificates signed by them.
Other Uses
- The system can also be used for client authentication in order to limit access to a web server to authorized users. To do this, the site administrator typically creates a certificate for each user, a certificate that is loaded into his/her browser.
nginx engineX
Permissions
Make sure the permissions of the files in the directory are accessible to the other group. Or change the permissions to the user that nginx runs as (for debian it’s www-data).
Setting up Basic Auth
- Install apache2-utils to get htpasswd
- Create an .htpasswd file in the web root. Make sure the permissions are 644. Note that the password generated by htpasswd is an apache modified version of MD5.
sudo htpasswd -c /usr/share/nginx/html/.htpasswd amit
- Update /etc/nginx/sites-available/default in the location / and reload nginx:
# Basic auth
auth_basic "Restricted";
auth_basic_user_file /etc/nginx/.htpasswd;
Setting up Digest Auth
- apache2-utils includes htdigest (similar to htpasswd) to generate digest key.
- Create an .htdigest file in the web root. Make sure the permissions are 644. Note that the realm here is “Access Restricted”.
sudo htdigest -c /usr/share/nginx/html/.htdigest "Access Restricted" amit
- Need to build with nginx-http-auth-digest module from https://github.com/rains31/nginx-http-auth-digest. In order to do this, download nginx debian sources, copy nginx-http-auth-digest to debian/modules, and finally edit debian/rules to build nginx-http-auth-digest (look at –add-module config option).
- Update /etc/nginx/sites-available/default in the location / and reload nginx:
# Digest auth
auth_digest "Access Restricted";    # Realm
auth_digest_user_file /usr/share/nginx/html/.htdigest;
Others
HTTPie - Command Line HTTP Client
Very useful and feature rich command line http client written in Python (http://github.com/jakubroztocil/httpie).
Useful for debugging HTTP requests. For example:
$ http get http://localhost
HTTP/1.1 200 OK
Connection: keep-alive
Content-Encoding: gzip
Content-Type: text/html
Date: Mon, 01 Sep 2014 18:31:03 GMT
Last-Modified: Tue, 05 Aug 2014 11:18:35 GMT
Server: nginx/1.6.1
Transfer-Encoding: chunked

<!DOCTYPE html>
<html>
<head>
<title>Welcome to nginx!</title>
<style>
    body {
        width: 35em;
        margin: 0 auto;
        font-family: Tahoma, Verdana, Arial, sans-serif;
    }
</style>
</head>
<body>
<h1>Welcome to nginx!</h1>
<p>If you see this page, the nginx web server is successfully installed and
working. Further configuration is required.</p>

<p>For online documentation and support please refer to
<a href="http://nginx.org/">nginx.org</a>.<br/>
Commercial support is available at
<a href="http://nginx.com/">nginx.com</a>.</p>

<p><em>Thank you for using nginx.</em></p>
</body>
</html>